SVG Flags of the world (pro) coming soon!
Easy Digital Downloads – Hide Extensions
EDD Hide Extensions
This is an essential plugin for anyone who uses Easy Digital Downloads.
On a site that uses Easy Digital Downloads you can typically have over a dozen (or more) extensions installed. Unfortunately on the main plugins page in the WordPress admin this means you have lot’s of plugins to scroll past to manage your other plugins.
But not any more! See below for how easy it is to hide EDD extensions.

Using this handy little plugin you can now very easily toggle the visibility of all your EDD extensions. Once hidden, your extensions collapse underneath the main EDD plugin.
Icons are added to show information about how many extensions are hidden, plus how many (if any) have updates available. If any extensions do need updating then simply click to expand the list again and update as necessary. Once complete just hide them again. Easy!
This makes managing all your other plugins a breeze. Now, you only ever have ONE EDD plugin visible which cuts down on the list of plugins you have to scroll past dramatically.
Features at a glance:
- Toggle the visibility of all EDD extensions
- Visibility persists between page loads
- Icons show how many extensions hidden and which ones need updating
- Makes navigating the WordPress admin plugins page much easier!
- Super fast one-click to hide extensions
- Hides extensions whether EDD main plugin is activated or deactivated!
Easy Digital Downloads – Hide Extensions Changelog
Version 0.1 - 6th April, 2017
- Initial release.
jQuery UI Widgets Pro
jQuery UI Widgets Pro
If you use custom jQuery or JavaScript anywhere on your site then this plugin will save you a HUGE amount of time and effort! Enter custom JavaScript/jQuery code via beautiful syntax highlighted code editors.
The JavaScript editor even has basic built-in debugger!
Plugin Features
- Add jQuery UI widgets, effects, and interactions in seconds
- Separate JavaScript/jQuery and CSS code editors
- JavaScript/jQuery code editor includes built-in debugger!
- Library of 34 ready-made jQuery UI templates included
- 24 beautiful jQuery UI themes
- Very flexible solution for adding jQuery UI to your site
To add jQuery UI Widgets, effect, and interactions to your site header simply select the required scripts via drop down boxes and the plugin will do the rest.
You can then enter custom JavaScript, jQuery, or CSS code via dedicated code editors, which can be added to ALL pages or just a single specific page. YOU have complete control!

Choose Your jQuery UI Scripts
In plugin settings select which jQuery UI scripts you want to be included in your site header.

Select one or more scripts from each list box as required. These will be added to the front end of your site on every page. Click the ‘Select All’ buttons to select every script for a particular list box.
Adding Custom Code and Styles
Enter custom JavaScript/jQuery and CSS, via the code editors, to initialize your jQuery UI widgets, and add effects and interactions etc.

You can insert ready-made jQuery UI templates via the drop down box to the bottom right of the ‘Custom jQuery Code’ editor. There are 34 templates included with the plugin covering every available jQuery UI widget, effect, and interaction.
To the bottom left of the editor are buttons to clear the editor content and insert the default jQuery wrapper to save you having to keep entering it manually.
24 Beautiful Themes to Choose From
There are well over twenty themes included with the plugin to display jQuery UI widgets exactly how you want to.

Chances are you’ll be able to find a jQuery UI theme to match your existing website. However, you have the choice via advanced theme options to specify a custom jQuery UI theme which allows you to tweak any existing theme or create an entirely new one that will match your WordPress site perfectly!
Targeting Specific Pages
By default the jQuery UI widgets, effects, and interactions (plus custom code) specified on plugin options page are added to EVERY page on your site. This is ideal if you want to add items to the header, footer, or sidebar which are typically displayed on every page.
However, if you have a specific page (perhaps a landing page) that requires certain custom scripts and code for that page ONLY then it isn’t a good idea to include this on every page. Not only is it inefficient but it increases the risk of conflicts in your scripts.
To solve this problem jQuery UI Widgets Pro allows you to specify scripts and custom code on specific pages. Simply go to any post or page editor and scroll down until you see the “jQuery UI Widgets Pro” meta box. This contains very similar controls to the plugin options page.

Specify the scripts you want to include, just like you did before, plus any custom JavaScript/jQuery and CSS. That’s it! You now have all your scripts and custom code neatly wrapped up and included on a specific page.
Adding Custom Code ONLY
It’s worth mentioning that even if you don’t want or need to add jQuery UI widgets, effect, and interactions to a page you can still use the JavaScript/jQuery and CSS code editors to add custom code.
This could be any general code or styling that you want to apply globally (via theme options), or on specific pages (via the post editor). The plugin is flexible enough to allow you to do this without the overhead of including unnecessary scripts, which would be redundant if your custom code doesn’t reference them.
For plugin setup details check out the documentation. And if you need more information please contact us here for pre-sales questions. We’d love to hear from you.
jQuery UI Widgets Pro Changelog
Version 0.1 - 25th May, 2016
- Initial release.
Content Censor

Content Censor
Protect your site today from profanity, explicit or inappropriate content, and abusive terms with our easy to use plugin.
Content Censor also has a built-in analyzer which actively scans your ENTIRE site, flagging specific instances (and the location) of unwanted content. With a range of flexible configuration options, you’ll be up and running protecting your site in no time.
Plugin Features
- Protect your site in seconds
- Works right out of the box
- Probably the easiest way to protect your site from unwanted content
- Choose which WordPress content to filter
- Built-in scanner actively searches ALL content and compiles a report of matched terms
- Case sensitive/insensitive search options
- Strict or non-strict filtering options to ignore terms embedded in other words
- Choice of characters and formatting options to replace matched terms on the front end
- *NEW* Automatically filter bbPress, and BuddyPress content too (if those plugins are active).
The Content Censor plugin enables you to easily filter out and remove unwanted words and phrases anywhere on your site including comments which makes it ideal for automatic comment moderation!
Simply enter a list of keywords to specify unwanted content keyword phrases and let the plugin do the rest. No other configuration is required, but there are extensive options to tweak how censored content is filtered and displayed on the front end of your site.

The plugin gives you full control over which areas of your website have their content filtered. By default, content is filtered on all Pages and Posts including any excerpts, but you can select any combination from the following options
- Page and Post Titles
- Page and Post Content
- Comments
- Tags
- Tag Cloud

You can also exclude specific Posts and Pages on your website from being censored. You just need to enter their ID’s and the Plugin will take care of that for you.

When any of your keywords are matched, they are replaced with wild card characters. Options are available to retain the first letter only, show the first and last letters or replace all letters (wild card characters only).

All plugin settings (apart from the license key) can be reset at any time to return settings to their defaults. The license key field is not included in the reset for convenience.
Note: If bbPress is installed (and activated) then Content Censor will filter bbPress titles/content too.
Example Usage
Say you wanted to remove all instances of the word ‘apple’ from your site. Just add it to the list of keywords on the plugin settings page.
Then, wherever ‘apple’ is used in a title, page content, comment etc. it will be replaced with a censored placeholder as follows:
An apple a day keeps the doctor away.
becomes:
An ***** a day keeps the doctor away.
You can enter as many keywords as you wish. So, if you wanted to also flag the word ‘doctor’ then add it to the keyword list and the above sentence would now be displayed as:
An ***** a day keeps the ****** away.
One of the ways you can control how words are filtered is by using strict filtering. When enabled, flagged keywords which are embedded in whole words are ignored. So, if one of your specified keywords is ‘pet’ this is how it would appear:
Enter the competition and see what you could win!
and with strict filtering disabled:
Enter the com***ition and see what you could win!
Actively Removing Unwanted Content From Your Site
Content Censor does a great job at protecting your site from unwanted content, but what if you wanted to actively remove all instances, or replace them with more appropriate content?
To do this you need to know exactly where the inappropriate content is located on your site. With Content Censor you can easily do just that! Using the built-in content scanner you can search your entire site for any unwanted words or phrases.
To get started select the Scan Content tab in plugin settings.

The content scanner interface is pretty simple. There is just a single Scan Now button that commences the scan. Once running, your sites entire content will be scanned for unwanted content.

In just a short while (depending on the size of your site) a report is compiled showing every matched keyword. Note: The keyword used to match unwanted content are taken from the Keywords to Remove text box on the Filter Settings tab.
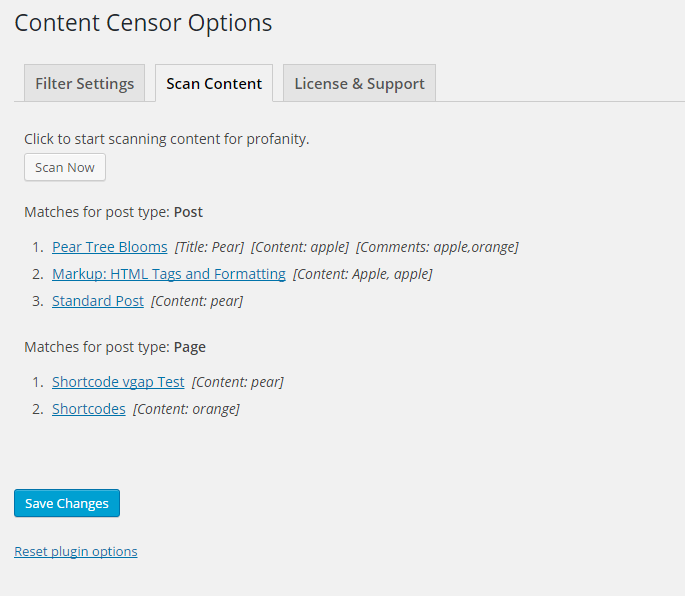
The screenshot above shows the results of an example content scan. There were just 3 words specified in the list of keywords in plugin settings: Apple|Pear|Orange. Strict filtering was also set to ON, and case insensitive matching was enabled.
Note: these are the default settings for strict filtering and case insensitive matching so no extra configuration was required.
As you can see results are split into individual WordPress post types. This is very useful as you could have several different post types active (events, documentation, slides, testimonials, portfolios etc.), so seeing matched results against each post type makes it much clearer where unwanted content is located on your site.
For each post type matched results are further split into individual posts containing at least one match. Each match is shown in square brackets separated by a colon (:) character. The text on the left points to where the match occurred (e.g. Title, Content, Comments etc.), and the text on the right shows keyword(s) found.
To remove or edit each instance of unwanted content simply click the title link for any matched result to go directly to the relevant page (opens in a new window) where you can manage the unwanted content as required.
For full details of plugin settings check out the documentation. And if you need more information please contact us here for pre-sales questions. We’d love to hear from you.
Content Censor Changelog
Version 0.4 - 13th March, 2017
- Added new option to ignore HTML tags and attributes. This helps when some of your keywords might match URLs used in image tags or anchor (link) tags.
Version 0.3 - 1st September, 2016
- Fixed bugs in BuddyPress filter callback functions.
Version 0.2 - 31st May, 2016
- Added support for filtering BuddyPress titles, content, and comments!
- Fixed bug when replacing first or first/last letter in matched keyword. Replaced characters now respect the original case.
Version 0.1 - 10th March, 2016
- Initial release.
Simple Sitemap Pro

Simple Sitemap Pro
Adding a HTML sitemap has never been so easy. Simply enter the sitemap shortcode [simple-sitemap] on any page to display a full featured, rich sitemap on any page.
There are plenty of configuration options to control the layout of the sitemap in columns, or even tabs! You can also choose which post types are displayed, and exclude individual posts with ease.
Plugin Features
- *NEW* Display ANY nav menu as a sitemap.
- *NEW* Show hierarchical parent pages as links or plain text.
- *NEW* Customize sitemap titles for specific pages (via filter).
- Add a HTML sitemap in seconds
- Works right out of the box. No configuration needed
- Fully responsive. Looks great on mobile devices.
- Flexible layout options, including tabbed display
- Show any or all post types, and in any order
- Exclude individual posts
- Order posts by title, date, id (ascending or descending)
- Display sitemap as a continuous horizontal list of posts/pages
Tabbed Layout
You have total control over what’s displayed at all times. To enable the tabbed layout add the ‘render’ attribute: [simple-sitemap render="tab"]. This results in a sitemap displaying posts for each specified post type in a separate tab, similar to the example output below.

That’s it! That’s all you need to do to show a complete fully featured sitemap with tabbed layout to your site. It really is that simple.
But that’s not all. The sitemap is fully responsive by default for all layout modes (single column, multi-column, and tabbed) meaning it looks great on all devices.

There are many options available to alter the sitemap output but it works right out of the box with no extra setup required whatsoever. You can customize how your sitemap appears via the flexible configuration options. For example, you can easily choose to:
- Remove default list bullet point icon
- Add featured images (if defined for a post)
- Add post excerpts
- Add a separator between sitemap items.
- Order the list of posts via title, date, id etc.
Use any combination of these options to display your sitemap exactly as you want!
Shortcode Attributes
Here’s a full list of attributes you can use with the [simple-sitemap] shortcode. The default values for each attribute are also shown:
render=''types='post, page'page_depth='0'title_tag=''post_type_tag='h3'orderby='title'order='asc'excerpt='false'excerpt_tag='span'exclude=''show_label='true'links='true'image='false'list_icon='true'separator='false'id='1'horizontal='false'horizontal_separator=', '
And, of course, enabling additional configuration options still results in a great looking sitemap when viewing on mobile devices.
The sitemap can alternatively be displayed in a single or multiple column layout. For the multi-column layout the columns wrap automatically at smaller browser widths and on mobile devices.
Remove Parent Page Links
New in v0.6 is a feature to allow you to manage parent page links for hierarchical pages. You can choose to remove ALL parent page links OR on specific ones ONLY, leaving just the title text.
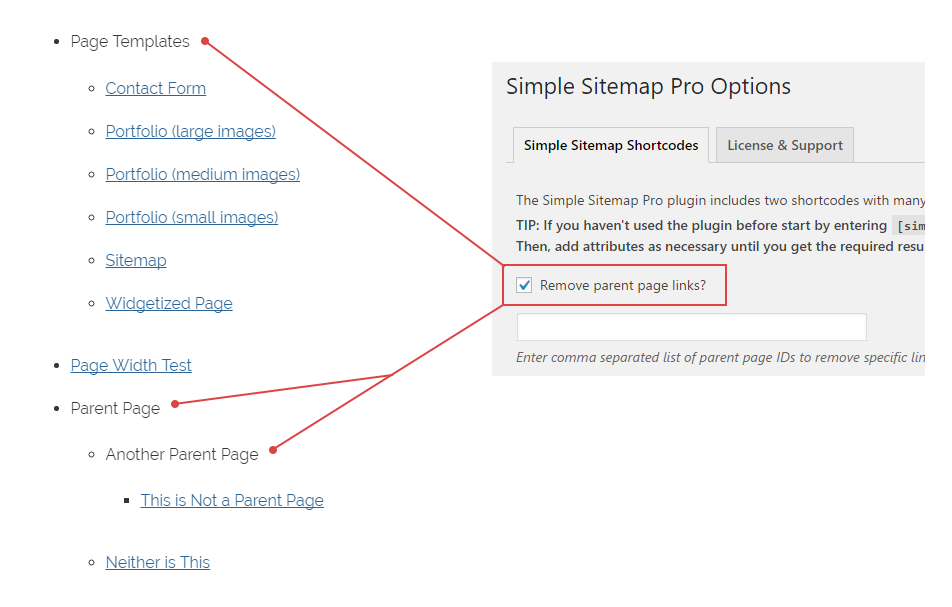
This will now only show the parent page title text without any links. This can be useful when you want to group pages under a single parent (to better organize your content) but don’t want the parent page to actually contain any content. In this case it’s pointless to link to the (blank) parent page.
For maximum flexibility you can also specify a comma separated list of parent page IDs to remove links for specific parent pages ONLY!
Filter Sitemap Titles
Sometimes the titles you enter for post/page titles are very long. These don’t look great when displayed inside your sitemap. To remedy this you have the option to filter any title to whatever you want! See plugin documentation for more details.
Horizontal Sitemap Layout
You can also display your sitemap as a horizontal list of posts using the new horizontal and horizontal_separator attributes:
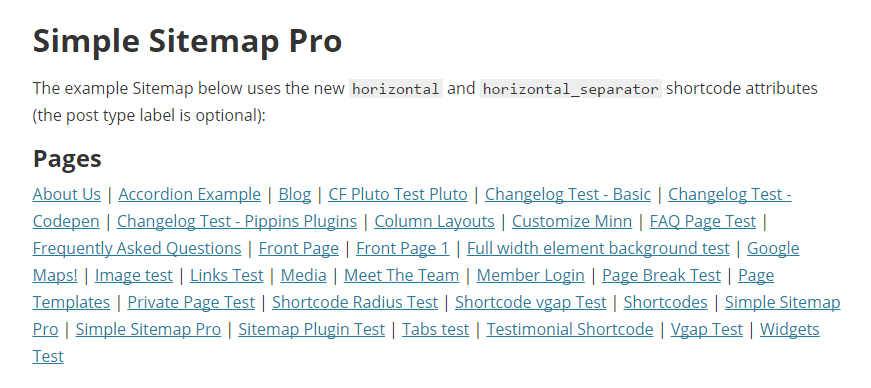
You can choose how to separate items in the horizontal list by using the horizontal_separator attribute. The default is a comma but in the previous example this has been changed to ‘ | ‘. The full shortcode used to produce the horizontal list of pages above is:
[simple-sitemap types="page" horizontal="true" horizontal_separator=" | "]
No matter which layout option you choose you can be sure that your sitemap will look great on all devices!
List Any Post Type
With Simple Sitemap Pro you can list content from ANY registered post type as well as normal posts and pages.
You don’t even need to remember which custom post types are installed as the plugin automatically displays the current post types available via a multi-select dropdown box.
If you’re displaying posts from multiple post types these can be listed in any order you like. They are displayed in the order selected in the dropdown, and can easily be reordered at any time if needed.
List Taxonomies For Any Post Type
When listing posts sorted by taxonomy you aren’t limited to the ones included in WordPress core. By default categories and tags are the only taxonomies available for posts.
With Simple Sitemap Pro ANY registered taxonomy associated with a post type can be selected via the sitemap user interface. This gives you a lot of flexibility in what you can display in your sitemap.
Download Today – 100% Risk FREE!
Why not try out Simple Sitemap Pro right now and add a comprehensive sitemap to boost SEO and user engagement on your website? Click here to get started.
The available shortcodes (and all attributes) are listed on the Simple Sitemap Pro plugin settings page inside the WordPress admin area. You can also refer to the plugin documentation for full details of the configuration options available.
And if you need more details please contact us here for pre-sales questions. We’d love to hear from you.
Simple Sitemap Pro Changelog
Version 3.6.1 - May 20, 2025- [fix] Updated nonce checks on post duplication feature.
- [fix] Localization issues.
- [update] Settings page sanitization.
- [update] Updated plugin to be compatible with WordPress 6.5.
- [update] Updated Freemius SDK to 2.7.2.
- [fix] Implemented reported security fixes.
- [fix] Fixed sitemap group block/shortcode.
- [fix] Updated server-side render component.
- [fix] Lodash missing external.
- [fix] Security related fix. Freemius SDK updated to v2.5.10.
- [fix] Links for group sitemap block were not displaying.
- [fix] Excerpt content were not stripping content containing shortcodes.
- [fix] Inspector panel label partially hidden.
- [fix] Security related fixes and updates.
- [new] Exclude page along with its all child pages.
- [fix] Fixed bug affecting include/exclude term attribute. Affected edge cases when category slugs used with \'hyphens\'.
- [fix] Enqueue error on admin widgets page.
- [fix] Sanitize non-supported sitmap shortcode attributes.
- [update] Sticky Post was always included when including a single post in a sitemap shortcode or block.
- [update] Add PHP docblock @return comments to functions & class methods future.
- [fix] Styles not enqueued for sitemap shortcodes.
- [update] Added compatibility with WP 6.x.
- You can now override the dynamically generated sitemap ID with a static ID of your choosing.
- Block CSS is now only loaded on pages that include a sitemap block.
- Updated Freemius SDK.
- Security update. Fixes minor issues in the Freemius SDK (that handle licensing and plugin updates).
- The "post_type_label_font_size" and "sitemap_container_margin" attributes in the sitemap blocks/shortcodes are now set to an empty string by default to blend in better with the current active WordPress theme.
- The "visibility" attribute is now set to "false" by default so private posts/pages won\'t appear in the sitemap list unless it\'s set to true.
- Tidied up configuration files. Added .eslintignore to the list of files to auto-remove from deployed free/pro plugin versions.
- Added new "Random Order", "Menu Order", and "Comment Count" options to the sitemap block Orderby drop down.
- Added new "num_terms" shortcode attribute to optionally limit the number of taxonomy terms displayed.
- Added a preview for sitemap and sitemap group blocks in the editor window.
- Refactored plugin codebase.
- The "visibility" attribute is now set to false by default so private posts/pages won\'t appear in the sitemap list unless this is set to true.
- The "post_type_label_font_size" attribute is now set to empty by default (was previously "1em") to blend in better with the current active WordPress theme.
- The "sitemap_container_margin" attribute is now set to empty to blend in better with the current active WordPress theme.
- Fixed compatibility issue with PHP 8.0.
- Updated plugin to use PHP namespaces.
- * Improved sitemap block rendering (using new ServerSideRender component).
- FIX: Nofollow links were always enabled. These are now OFF by default and can optionally be enabled if required.
- Added block setting for nofollow links. Enable/disable nofollow links directly.
- FIX: Undefined index
page_excerpt_length.
- NEW: Added
show_excerptandpage_excerpt_lengthshortcode attributes to[simple-sitemap-child](see docs). - NEW: Added
page_excerpt_lengthshortcode attribute to[simple-sitemap](see docs). - Fix: Horizontal sitemap trailing separation character on last sitemap item for pages removed.
- Fix: Page depth setting not saving.
- Fix: Plugin settings heading styles broken because of EDD license renewal nag notice.
- Some minor bug fixes and improvements.
- Initial plugin release of the new pro version.
- Complete plugin overhaul.
- Support added for integration with the Freemius system.
- Two new blocks added to replace existing shortcodes.
- Shortcodes are still available though.
- Fixed bug with new
taxonomy_linksshortcode attribute added to[simple-sitemap-group].
- Added shorter aliases for all shortcodes. e.g.
[simple-sitemap-group]has the equivalent[ssg]shortcode available. - New
taxonomy_linksshortcode attribute added to[simple-sitemap-group]. Set to true to show taxonomy headings as links:[simple-sitemap-group taxonomy_link='true']
- jQuery UI CSS separated out into its own file.
- jQuery UI JavaScript and CSS now only added on the front end if the sitemap uses a tabbed layout.
- Other minor code enhancements and refactoring to improve plugin structure and performance.
- Fixed bug in new filter.
- Added new filter to be able to append content outside of each sitemap link.
- Fixed minor issue with title text filter.
- New hook parameter added to allow titles to be easily filtered.
- Updated plugin license code.
- Added better support for nav menu container classes to not conflict with site nav menus.
- Added new
[simple-sitemap-menu]shortcode to output a sitemap based on a nav menu.
- Fixed bug with the
[simple-sitemap-child]shortcode and added attribute to set the post type used.
- Added new
[simple-sitemap-tax]shortcode to list taxonomy terms (e.g. categories).
- Added new attribute to all sitemap shortcodes to hide private posts, and only show public ones. By default all public/private posts are displayed.
- Added new attribute to all sitemap shortcodes to optionally set each link to \"nofollow\".
- Added new shortcode
[simple-sitemap-child]to list child pages of a specific parent page. You can now easily create separate lists of child pages for each parent page.
- Add new attribute for the group shortcode to allow exclusion of one or more taxonomy terms. Example usage is: [simple-sitemap-group exclude_terms=\"term1, term2\"].
- Another bug fix for the new plugin option to remove parent page sitemap links. Check box setting was not persisting after saving.
- Fixed bug with the new plugin option to remove parent page sitemap links.
- Added options to remove sitemap links for ALL parent pages or just specific ones.
- Added filter for post titles so that long titles can be shortened for specific posts.
- Fix. Tabbed layout CSS updated and now displays correctly.
- New \"horizontal\" and \"horizontal_separator\" shortcode attributes added to display the sitemap as a horizontal list of posts.
- Initial release.
SEO Media Manager

SEO Media Manager
Any type of media can be formatted (as well as images) such as video, audio, documents, and zip files – which makes SEO Media Manager perfect for managing your entire media library!
As new items are added to the media library the plugin automagically formats them into a much cleaner human-readable form. HTML attributes are also auto-formatted when a media item is added to a post or page via the WordPress editor.
Pro Plugin Features
- Automatically inserts ‘title’ attribute to images when adding media to posts. (WordPress doesn’t do this by default anymore)
- Improves SEO rating!
- Beautifully formatted media titles
- Formatted titles based on uploaded filename or fixed text of your choosing.
- Handles any WordPress media type
- Built-in batch processor to (re)format ALL existing media
- Automatic formatting
- Powerful and flexible formatting options
- Huge time-saver, especially when uploading multiple media items
- Formats title, alt, caption, and description media fields
- No more ugly image titles
- Makes captions look fantastic in image lightboxes
- Also handles image slider titles and captions
- Plugin filters for complete control over formatting.
How it Works
When the SEO Media Manager plugin is NOT activated the default WordPress behavior bases media titles on the uploaded image filename which usually results in very poor image names.
As soon as the plugin is activated the results are instantaneous. Media titles are now beautifully formatted into a much better aesthetic human-readable form.
Let SEO Media Manager handle the 100% automated process, cleaning up media titles as they are uploaded. What could be simpler? The plugin can be seen in action below.
SEO Media Manager can automatically format other fields too during the upload process including:
- Title HTML attribute
- Alt HTML attribute
- Media caption
- Media description
Each field is formatted based on the uploaded filename of the media item, and based on the current plugin settings which can be configured as required.
The plugin is so flexible it’s very easy to tweak settings between media uploads. This is incredibly useful (for example) when uploading new images, which typically require a new set of formatting rules applied. SEO Media Manager allows you to do this quickly without interrupting your workflow.
Some Examples
Say you uploaded an image with a typical filename such as:
tml-long-haired_girl-15767_150.jpg
By default WordPress processes the media title to be:
tml-long-haired_girl-15767_150
This is the title that would be used in the media library and when the image is inserted into a post or page. Yuck.
With SEO Media Manager activated when the same uploaded image is processed the result is:
Long Haired Girl
Just a slight improvement! Now when you add this image to a post or page you can be sure the popup title, or lightbox caption will always look fantastic.
The plugin works by looking for and removing certain unwanted characters such as hyphens, underscores, numbers etc. You can also specify phrases to be removed too such as ‘tml’ in the above case. The remaining text is then capitalized according to plugin settings.
Here’s another one. Let’s take another image with the filename:
pf-flower-garden-250016_1920-1024×740.jpg
This time we’d like to specify additional characters/phrases to be removed: “pf”, and “x”. Just add these to plugin options.
Now when this image is uploaded the resulting media title is:
Flower Garden
Much better!
Custom Title Text
With the latest version of SEO Media Manager you can now even base the formatted title on any custom text you like. So, instead of the title being based on the media item filename it can be based on any custom text of your choosing!

What If I Have Existing Media Library Items?
SEO Media Manager includes a batch processor to (re)format existing media items. So, if you already have a full media library then you can run the batch processor to easily format ALL existing media library items.

Just as for new media library uploads, batch processing of existing media library items is performed based on the current plugin settings.
Another way to use the batch processor is to reformat all current media items based on different settings. Simply update plugin options and rerun the batch processor. Perhaps you want to change the way the title is capitalized for all images. This is super easy with the batch processor!
Plugin Settings
Although there are plenty of settings available to format media exactly as you want the plugin does a great job of automated processing out of the box. The default settings allow you to start uploading images and other media straight away with minimal configuration.
Here are the main plugin options available:
- Remove special characters and symbols
- Enter a comma separated list of phrases to be removed
- Choose case management
- Choose capitalization method
- Copy formatted filename to various other meta fields
- Batch process all existing media items at once
There are also plugin filters included to allow you to control exactly how the media data is formatted. This is very useful if you have custom requirements or need dynamic data inserted during formatting.
For full details check out the plugin documentation. And if you need more information please contact us here for pre-sales questions. We’d love to hear from you.
SEO Media Manager Changelog
Version 0.8 - 18th October, 2018
- Fix: The 'title' media attribute is now automatically added to images and other media when inserted into the post editor. The 'title' attribute is also added for image galleries too. No more manual adding of 'title' attributes!
Version 0.7 - 9th January, 2018
- New: Added a new feature to optionally specify fixed text for the title rather than being based on the media filename.
Version 0.6 - 16th January, 2017
- Update: Added two filters to customize the title and alt fields.
Version 0.5 - 16th November, 2016
- Fix: Updated the logic for getting the unaltered filename for newly uploaded media.
Version 0.4 - 10th November, 2016
- Added new plugin option to choose the source title for newly uploaded media items. The default title is processed via WordPress (which has a bug in WordPress 4.6.1). You can also choose to get the title from the originally uploaded media item filename (which bypasses the WordPress bug).
Version 0.3 - 14th June, 2016
- Enhanced new UI controls to allow selection of specific media items to be more intuitive.
Version 0.2 - 13th June, 2016
- NEW - Added controls to allow selection of specific media items to batch process.
Version 0.1 - 1st March, 2016
- Initial release.