After purchase you can download the plugin zip file from your WPGO Plugins account area. Complete the following steps to install SEO Media Manager on your site:
- On the site you wish to install the plugin go to the WordPress admin dashboard and click the Plugins link in the left hand menu.
- At the top of the Plugins list page click the Add New button, and then on the next page click the Upload Plugin button.
- You’ll now see a Choose File button. Click it and select the plugin zip file you downloaded to your computer earlier.
- Once the plugin has been selected click the Install Now button to begin the installation process.
- In a few seconds you should see a Plugin installed successfully message. Click the Activate Plugin link underneath to make the plugin ready for use.
Once installed and activated go to Settings > SEO Media Manager to access plugin settings. There are three tabs to navigate the various settings. The Main Settings tab is selected by default and contains the necessary options to manage how your media items are formatted.

Any new image (or other media item) you upload will have it’s title field formatted automatically and optionally it’s alt, caption, and description fields. Formatting is normally based on the original uploaded file name, but you can also force the title to be any fixed text you like.
The details of the formatting are controlled via the plugin setting so let’s walk through the options available. Make sure the Main Settings tab is selected.
Note: The file name itself will not be altered during formatting. It’s only the title/caption/description media meta information that will be affected.
To start with the string used for the title can be either based on the uploaded media item filename or fixed text. If you want fixed text then enter a string in the Fixed Title text box. Leave this field blank if you want to use the filename as the base for formatting the title.

Then we can select special characters to remove from the uploaded file name. Any instances of these character will be removed automatically directly after the upload completes.

We can also add a comma separate list of words/phrases that will be removed. This is very useful if you are uploading a set of images that contain a fixed string that you’d like to remove. For example, say you had several images that had the string ‘IMG’ at the end of every file name:
red-IMG.png
blue-IMG.png
orange-IMG.png
black-IMG.png
white-IMG.png
Simply add ‘IMG’ to the text box in the Characters to Remove section and the resulting output would be (assuming you were removing hyphenated characters too, and had capitalization enabled):
Red
Blue
Orange
Black
White
Once special characters and strings have been removed you can choose to convert all characters to uppercase or lowercase. This is useful if you think some words could potentially contain a capital letter somewhere other than the beginning of a word. It allows you to make sure all characters are in a consistent format prior to being capitalized.

The capitalization settings allow you to capitalize the first letter of each word, the first letter of the first word only, or none (which doesn’t capitalize any words at all).

A new option was added in v0.4 to choose the title source for newly uploaded media library items. By default this is set to the title processed by WordPress, which can potentially alter the title in unexpected ways. You can also choose the title from the originally uploaded filename (minus extension) which has had NO processing performed on it.

Finally, you can optionally copy the formatted file name to other media item meta fields (as well as the title field) such as alt (default), caption, and description fields.

Batch Processing
If you have existing items in your media library, or just want to reformat all current items to a different format then you can use the batch processor.
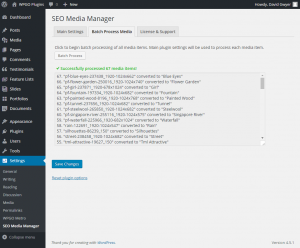
It works by cycling through every image in your media library and creating a new title/caption/description based on the media item file name and the plugin options on the Main Settings tab. i.e. It formats each media item using exactly the same settings as when you upload a new item to your media library. The image below shows results of the batch processor after completion on a test site for demonstration purposes.
Plugin Filters
Occasionally you might need to have more control over how the ‘title’ and/or ‘alt’ fields are customized for media items. In which case you can use either of the following filters. These work for newly uploaded media items and when batch processing media.
Filter: seo_media_manager_title
Description: Filters formatted media ‘title’ fields.
Usage:
[php]
add_filter( ‘seo_media_manager_title’, function ($title) {
return "my custom title"; // or $title . " my custom title";
});
[/php]
Filter: seo_media_manager_title
Description: Filters formatted media ‘alt’ fields.
Usage:
[php]
add_filter( ‘seo_media_manager_alt’, function ($alt) {
return "my custom alt"; // or $alt . " my custom alt";
});
[/php]
License and Support
Click on the License & Support tab for links to your WPGO Plugins account page, plugin support, and documentation. You can also enter your plugin license key for access to future plugin updates directly from the WordPress admin.
Still Have Questions?
We’d love to hear from you! If there’s any aspect of the plugin that you need help with or have any suggestions then please get in touch. You can contact us directly here.


